
Mom’s Homemade Manicotti Recipe
Many ago I wrote three blog posts about how to make homemade manicotti. That means these were some of the first blog posts I ever wrote. I divided it into (1) making the crepe batter, (2) making the crepes, and (3) stuffing and baking the crepes. I have no idea why I decided to do it like this. It was confusing. It was hard to follow. The recipe isn’t coherent. And you need to have multiple browser tabs open at once. It’s awful.
So today I bring you ONE POST how to make homemade manicotti. With a more comprehensive recipe, better photos, and a lot less of a hot mess.
Here’s what you need to know when you start: you need to start this process at least 36 hours in advance. That said, you could actually make the crepes ahead of time to spread out the work. Alright, now you know. Here we go – homemade manicotti.
Making the Crepe Batter
That’s right. Manicotti is essentially a crepe stuffed with ricotta and mozzarella. You could use these crepes for anything – Nutella, berries, etc.
Ingredients
Makes 20-24 crepes
1 ⅓ cup flour, sifted
1 ¼ cup milk
4 eggs
¼ teaspoon salt
3 tablespoons melted butter
Tools
Measuring devices
Mixing spoon
Bowls
Sifter
Blender
Instructions
Sift the flour.
Add milk to sifted flour a little bit at a time until well-blended.
Put the flour and milk mixture into a blender.
Add eggs, salt, and melted butter to the blender.
Blend ingredients together until smooth.
Cover and refrigerate the batter (in either the blender, bowl, or other container) for 12-24 hours before making crepes to make sure the bubbles have a chance to dissolve.


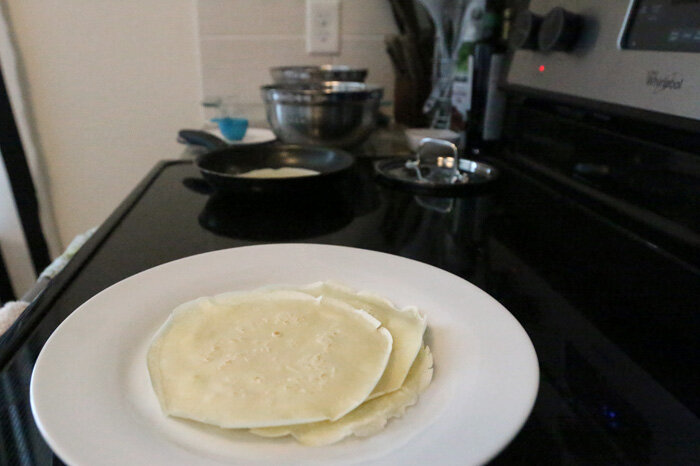
Making the Crepes
This part takes a little bit of time and keeps you standing over the stove for a little bit. It also takes some pretty skilled wrist-work. The first few times I ever tried this I failed miserably.
Ingredients
Oil for frying (if necessary)
Crepe batter
Tools
⅛ cup measuring cup
Frying pan, approximately 5.5”
Wax paper
Spatula or fork to flip crepes
Plate to cool crepes on
Paper towel to put on plate to cool crepes on
Instructions
Take the batter out of the refrigerator. Slowly stir it by hand a few times to ensure the mixture is homogenous.
Put very little oil in the frying pan. This may not be necessary if the pan is non-stick. I also recently used a stainless steel pan and did not need any oil.
Heat the pan with the oil to a temperature where if a drop of water is placed in the pan it splashes back out. Keep heat consistently right below this temperature constantly for even cooking.
Add ⅛ cup of batter to the pan and swirl the pan (off the stove) so batter covers the entire bottom of the pan. This must be done immediately after putting the batter in the pan.
When the bottom of the crepe is golden (not brown), flip it over.
Cook it briefly on the other side.
Once the crepes are cooked, put them on a plate to cool. Once they have cooled, place them in a stack with wax paper in-between each one. This makes it easier to (a) store them, or (b) stuff them. They can be stored in the fridge or freezer until you decide to use them.
It takes about 45 minutes to fry 24 crepes.


Stuffing the Crepes
Now this next part is going to take some calculation and ratios, but I have faith in you. There’s really no way to screw it up. It’s cheese, in a crepe.
Ingredients
1 1b. Ricotta per 12 crepes
1 lb. shredded mozzarella per 36 crepes
1 egg per 12 crepes
Grated cheese to taste
Black pepper to taste
Tools
A large table or counter
Bowl
Mixing spoon
Instructions
Mix all ingredients in a bowl
Lay the crepes out on the counter (each one should be on the piece of wax paper it was stored with)
Divide the filling evenly among the crepes. Place the mixture on the lower third of the crepe so that it is easier to roll.
Roll the crepes like a log.
It takes about 1 hour to make the filling and stuff 24 crepes.


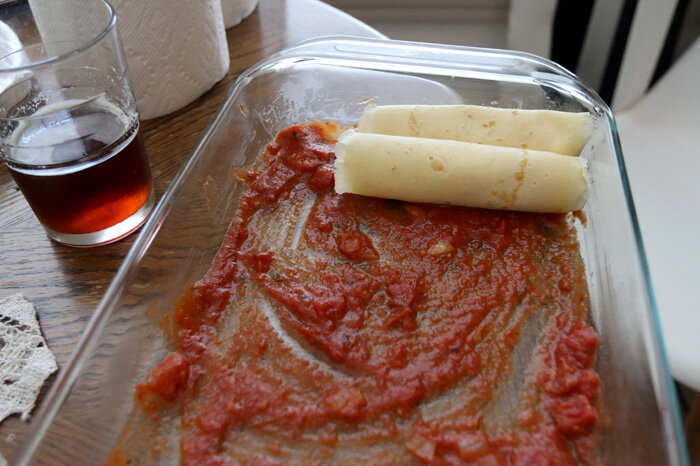
At this point, you have a decision to make. If you are baking the manicotti immediately after stuffing them, continue through the recipe. If you have done this step ahead of time, you can leave each rolled crepe on its individual sheet of wax paper and place them all into your 9x13 pans and refrigerate them overnight. Do not squish them. You can layer them if you need to (still each individually in the wax paper).
Baking the Manicotti
Now, yes, you could make your own sauce, but I haven’t quite been that adventurous yet. Nor have I had the time. If you’d like, you can doctor up the jarred sauce by adding an onion and garlic and cooking it for a few hours before you need it.
If you pre-rolled the manicotti, take them out of the refrigerator a bit ahead of time so they can warm up. If you use heated sauce when baking them, this will help counter that and also help them cook faster.
Also, fun fact. The first time I ever made these my mom told me the way to tell if they were done was to stick your finger in the center of them and see if it burns.
Ingredients
2 jars sauce per 24 crepes, heated
Oil
Grated cheese
Tools
Oven
Oven safe pans that will fit the manicotti
Tin foil
Instructions
Set the oven to 350 degrees.
Grease the bottom of the pan(s)
Put a thin layer of heated sauce on the bottom of each pan
Place the rolled manicotti in the pans all going the same direction so they’re easier to serve. Try not to squish them.
Coat the manicotti in sauce so they don’t burn.
Sprinkle the top with extra grated cheese.
Cover the pan(s) with tin foil to keep the heat in.
Cook the manicotti for 30-45 minutes, or until the insides are hot.

Serving the Manicotti
Serve the manicotti with extra sauce, garlic bread, and salad. And meatballs if they’re your jam.
And that’s it. I’ve used this recipe for friends and coworkers all over the country. It’s always a hit! I’m definitely hoping to get the opportunity to do it again soon.
