
Tips for Making Handmade Holiday Cards
This post was sponsored by Hero Arts. All thoughts and opinions are my own.
It’s that time of year again where I send handmade Christmas cards. This year I’ve changed the game a little bit though and split my holiday cards between Thanksgiving, Christmas, and New Year’s to make it more manageable. I sent 30 Thanksgiving cards, I will be sending 80 Christmas cards, and finishing it up with 20 New Year’s cards.
People I see the most got Thanksgiving cards because understand why I needed to start early. People I work for and clients will get New Year’s cards because it takes away the “problem” with sending Christmas cards. Also, people that don’t celebrate Christmas ended up on either the Thanksgiving or New Years’ list (for the most part).
This year I paired with Hero Arts to make my handmade Christmas cards. They sent me three awesome holiday stamps to use in my Christmas card designs: Peace & Joy, Merry & Bright, and Season’s Greetings. I love the hand lettering feel they each have. This past weekend I spent 10 hours making all 80 cards (this includes writing in 24 of them). Here are my best tips if you’re crazy enough to hand-make your cards as well (which I highly encourage):
Make your list first
Make the list of people you want to send cards to before you start. This way you know exactly how many cards you need. That said, always add a few to the final number.
Browse your stash
Go through your craft supply stash to see what items you have a lot of that you’ve been meaning to use. I used this year’s cards as a chance to (a) use some patterned scrap paper that is filling my scrap bin, (b) use a small pad of paper I have that I never remember to use otherwise, and (c) use some of my excess of black paper I got from Texas Style Council.
Think outside the box
Remember your cards don’t need to be red, green, white, gold, blue, and silver. There’s something whimsical about a purple, yellow, or orange Christmas card.
Get inspired
Browse Pinterest for inspiration (that’s what it’s there for). Here’s a link to my handmade card Pinterest Board if you need a place to start.
Only do each step once
Cut everything at the same time, fold everything at the same time, glue everything at the same time, stamp everything at the same time, and put your logo on the back at the same time. If you complete one card at a time you’re going to waste a heck of a lot of time.
Finish the envelopes before you start writing
Put the return address on, stamp them (this will hold you accountable to actually sending them), and write the recipient’s name on the envelope. When you write their name on the envelope, cross it off your list. Then place the envelopes with the finished cards. All that is left to do is write and address them – which means you can throw the stack in your bag to do during any random free time you have – or you can set up in front of the television and watch holiday movies.
Deal with the addresses in bunches
I sat down Sunday night with my computer and my address book. I wrote the addresses I had on the finalized cards, and every time one came up that I didn’t have an address for I immediately emailed or texted the person. By the time I got through the 24 cards I already had some responses.

Here’s a look at how my Christmas Cards turned out –


Using the Hero Arts Season’s Greetings stamp was the easiest for me. It’s the perfect size. I thought I Was going to be able to just stick the gray rectangle onto the colored background, but when I did that it felt like the card was very dull. An extra pop of white between the gray and colored edges was just what it needed. That said, it was pretty time consuming to glue in the extra layer. (Specifically because I forgot a piece of my tape roller so it wasn’t quite as automatic as it should have been.) Also, I always like to add some kind of embellishment to the cards. In this instance I decided washi tape would be a fun change of texture. Plus, it was super easy, it already sticks.
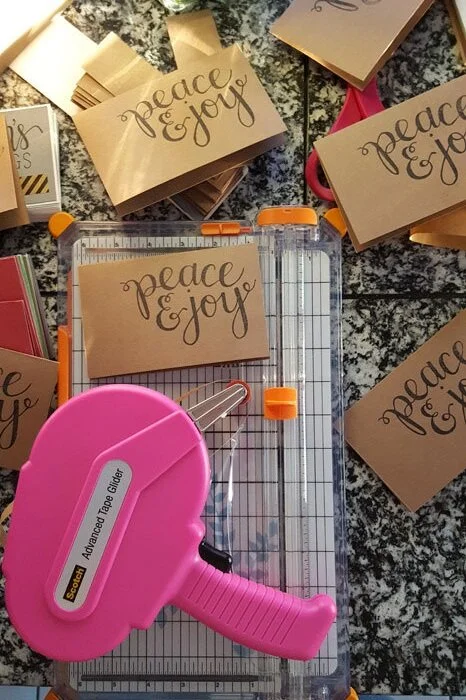
The Hero Art’s Peace & Joy stamp was a little bit more difficult for me to decide what to do with because it was so large. Pinterest helped out in this instance. I knew that I wanted to use the kraft brown paper, but it needed a pop of color. All over Pinterest people use stamps on printed paper, so I went back to my collection to see what else I had and found a stocking. I decided that would be the perfect addition to the Peace & Joy stamp. Then I attached the stocking to the card with foam squares to give it a bit of dimension (the embellishment on this card). When I was done I knew it needed a little detail so I added white dashes to the edges, which fit with the minimalist feel I was going for with the kraft paper. It didn’t take quite as long as I thought it was going to, which was cool. The longest part of this process was cutting out the stockings because my paper choice was pretty flimsy.
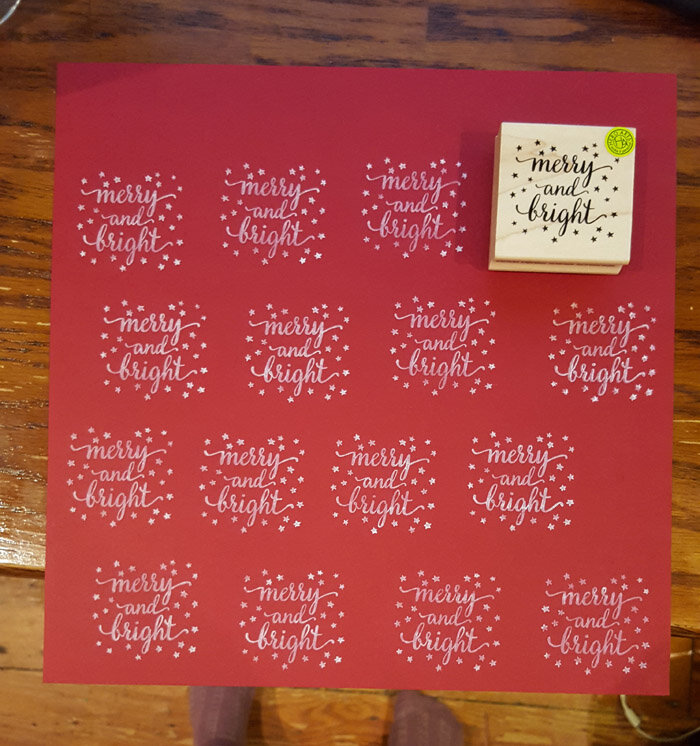
Somehow the Hero Arts Merry & Bright stamp was the hardest for me to figure out how to use – probably because it’s not just words, it also has little stars as decoration, so you can’t add it to the middle of a larger sheet of paper because it would look misplaced. I waited 36 hours after designing the first two cards before I could figure out how to design these. I ended up deciding that since it was a square stamp it reminded me of Santa’s belt buckle. I used white ink & embossing glitter to add a little texture to the stamp on blue and red paper. When I attached the stamped paper with black border to the card itself, I used the foam squares as well to make it look more like a belt buckle.

And there you have it, my three Christmas Cards of the year. It only took one weekend day and gave me the chance to watch a lot of sitcoms (one of my favorite past times). I’ve written 24 cards, and the next set of 24 is currently traveling with me in my metal Phineas and Ferb lunchbox (proof or it didn’t happen) so that as I get free time this week I can write a few more each day.
Do you make your Christmas cards? Or maybe just for one special person? I’d love to hear about it in the comments below – mainly to know that I’m not the only crazy one out there. Because, you know, crazy likes company.